Paleo Play
By Tiffany Doerr Guerzon
Keep kids engaged and learning this summer with these dinosaur crafts and activities. Make your own fossils from clay, create an erupting volcano, excavate dinos like a real paleontologist and even hatch a dino egg in a cool science experiment!
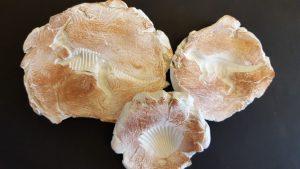
DIY Dinosaur Fossils
Supplies:
- Air dry clay
- Brown or black ink pad
- Small plastic dinosaurs or plastic dinosaur skeletons
- Optional: makeup sponge
Instructions:
Roll a ball of clay slightly larger than the dinosaur. Flatten the clay with your hand to about a half-inch thickness. Leave the edges and surface uneven, this adds to the look of old rock. Next, press the dino into the clay to make an impression. Remove the dino and allow the clay to dry. When the clay is dry, use your fingers or a makeup sponge to rub ink lightly over the surface (not inside the imprint) of the “fossil.” This makes the imprint stand out as well as giving it an aged look.
Try this technique with other toys as well. You can make footprint fossils with a larger dino toy, or make fossils from other animals, shells and plants.
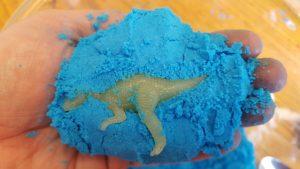
Hatching Dinosaur eggs
Ingredients (per egg):
- ½ cup baking soda
- 2 Tbsp food grade powdered citric acid. This can be found in grocery stores near the canning supplies or see supply buying list.
- 1-2 tsp oil
- Small plastic toy dinos
- Liquid food colouring
- Large bowl to “hatch” eggs in.
- Small bowl to mix eggs in
Instructions:
Make the dough: Put baking soda in a bowl and add food colour if using. Mix and knead the colour in with your fingers until the colour is distributed. This will colour your fingers, but it washes off.
- Add citric acid and mix in with spoon.
- Add 1 tsp oil and work it into the dough with your fingers.
- At this point the dough will be dry and crumbly, similar in texture to the product “Moon Sand.” You will know when it is ready when you can squeeze the dough in your hand and it holds together. Add more oil, one teaspoon at a time until it holds together and can be molded into a ball.
- Put the dinos in the eggs:
Scoop half of the dough in the palm of one hand and then press a dino into it. Cover dino with the rest of the dough and squeeze the dough in both hands until it sticks together. Notice that the dough is cold to the touch. The baking soda and citric acid react in an endothermic reaction, absorbing heat from the surrounding environment.
Now you can hatch your egg immediately!
To hatch: Fill a large bowl with water. Drop in egg and watch the fizzing begin! All of the dough will dissolve, leaving the dino.
DIY Dino Excavation
Supplies needed:
- Toy dino skeletons or dinos
- Cornstarch, at least 1 cup
- Water, about 2 cups
- Container large enough to “bury” the dino in
Instructions:
Choose a container that is just big enough to contain the dino, with enough space around it bury the dino in. a small bowl or a 3-cup storage container works well.
Add cornstarch to your container and pour the cool water over the starch slowly, mixing constantly with a fork. You’ll want the mixture to be about the consistency of pudding. If it gets really thick and too hard to mix, add more water. Add more starch if it is too thin. You may need to add more solution depending on the size of your container. Use two parts water to one part cornstarch. Once you have enough solution, put the dino in and push down so that it is no longer visible.
Allow to dry for 1-2 days. When the surface starts to crack, unmold your cornstarch solid onto a plate or baking dish to catch all of the debris when the dino is chipped out!. You may need additional dry time if the surface feels damp to the touch.
When it is dry, allow kids to be archeologists and dig out the dino. Wear safety glasses and use butter knives or spoons to chip away at the surface. Offer dry paint brushes to brush off the bones while excavating.
Ice Excavation
This activity presents a fun way to play paleontologist on a hot day.
Supplies needed:
- A shallow baking dish such as a 9×13 inch baking pan
- Several small plastic dinosaur toys
Instructions:
Arrange a few plastic dinosaurs on the bottom of the pan, and then fill the pan two-thirds full with water. Place pan in the freezer and freeze until you have a solid block of ice.
To excavate, remove the ice block from the pan and put it outside. Let the kids chip out the toys with metal spoons and butter knives. Be sure to provide eye protection. They could also experiment with melting the ice by pouring small amounts of warm water over the ice.
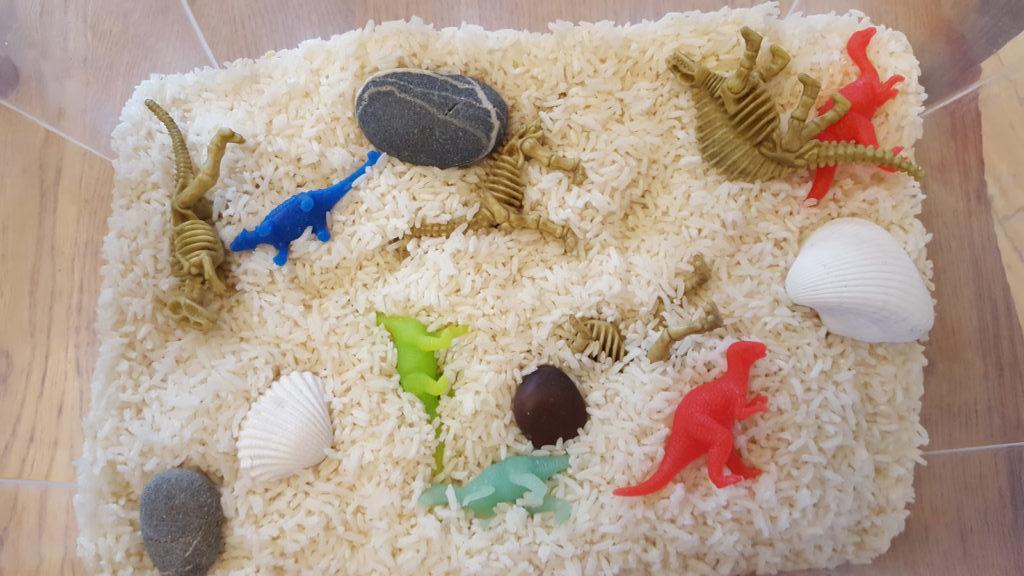
Paleo Sensory Bin
A sensory bin is a great way for younger children to learn and explore through hands-on play. Sensory bins are super easy to create and might even give a tired parent a break as it can keep kids occupied for quite a while.
Supplies needed:
- A container– something with enough space for kids to get both hands into and sift through rice or sand and find objects. Suggestions: a large bowl, a plastic storage container, a sandbox, a sand table, etc.
- Dry beans, rice or sand
Items for kids to find such as small and large plastic dinosaur toys, small rocks, shells, plastic eggs, play moss. A variety of sizes, shapes and textures is best for this type on hands-on play.
Instructions: Fill the container halfway with sand, dry beans, or rice. Add in toys and other objects. Allow kids to dig in and play!

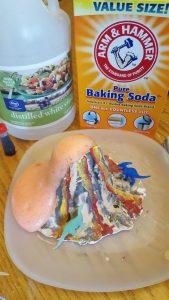
Erupting Volcano
No Jurassic-era play activity would be complete without a volcano! This one is made of clay and the eruption is created with a vinegar/baking soda reaction.
Supplies needed:
- Air dry clay, about one pound
- Small glass candle holder, these small glass cups used for votives can often be found at Dollar stores.
- Tempura or acrylic paint. One colour for the volcano, such as brown, plus red, yellow and orange to represent lava flow.
- Baking soda
- Vinegar
- Baking dish-disposable aluminum baking dishes work well for this project.
- Red liquid food colour
Instructions: Build your volcano inside the baking dish so that you don’t have to move it later. Place the glass votive holder in the center of your baking dish and then mold the clay around the glass votive holder in a mountain shape, leaving the center open. Paint with acrylic paints if desired. Allow to dry–this clay is thick so it will probably take 2-3 days. I recommend painting the clay right after molding because it saves a step.
To erupt the volcano:
- Add 1/4 cup baking soda to the glass cup inside the volcano.
- Add a few drops of red food colour to ½ cup vinegar and mix.
- Pour a little of the coloured vinegar into the glass cup and watch it erupt! When the fizzing dies down, add more vinegar. This amount is enough for 4 or 5 eruptions.
- Save your volcano to use again later.
Any of these activities will keep kids busy- and learning- during the slow days of summer.